XAMPP tutorial: run multiple PHP versions on Windows
Install and switch between multiple PHP versions in XAMPP on Windows using FastCGI (mod_fcgid) and per-project virtual host configuration.
- What You Will Need
- Step 1: Download the Additional PHP Version
- Step 2: Extract the PHP Files to the XAMPP Directory
- Step 3: Determine the XAMPP Architecture (32-bit or 64-bit)
- Step 4: Download and Install the FastCGI Module (mod_fcgid)
- Step 5: Configure Apache HTTP Server for FastCGI in XAMPP
- Step 6: Register the Additional PHP Version in Apache
- Step 7: Assign a PHP Version to a Project Virtual Host
- Step 8: Verify the PHP Version Assignment in XAMPP
- What You Learned
- What to Do Next
This tutorial walks through installing a second PHP version alongside the default XAMPP PHP installation on Windows. By the end, individual projects use different PHP versions through Apache HTTP Server virtual hosts and FastCGI (mod_fcgid).
What You Will Need
- XAMPP installed on Windows. See How to install XAMPP on Windows.
- Apache HTTP Server running from the XAMPP Control Panel.
- Administrator privileges on the Windows machine.
- A text editor (Notepad, VS Code, or Notepad++).
Step 1: Download the Additional PHP Version
XAMPP ships with one PHP version. Projects that require a different PHP version need a separate PHP installation alongside the XAMPP default. PHP provides Non-Thread Safe (NTS) and Thread Safe (TS) builds. XAMPP with FastCGI requires the NTS (Non-Thread Safe)build because FastCGI runs PHP as a separate CGI process rather than as an Apache module.
Download the desired PHP version from the official PHP downloads page. Select the VS16 x64 Non-Thread SafeZIP package for 64-bit Windows systems.

Step 2: Extract the PHP Files to the XAMPP Directory
XAMPP stores its default PHP installation in
C:\xampp\php\. The additional PHP version goes into a separate folder inside the XAMPP root directory. Name the folder to match the PHP version for clarity.
Extract the downloaded PHP ZIP package to a new folder in the XAMPP directory. For example, extract PHP 7.4 to
C:\xampp\php74\.
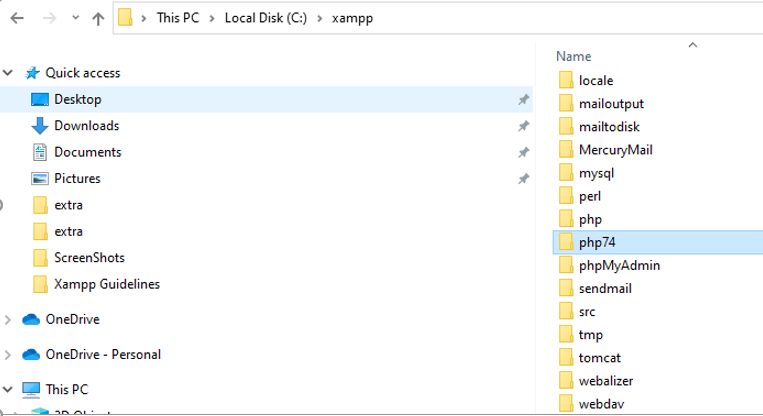
The folder name must not contain spaces. XAMPP uses this path in Apache HTTP Server configuration directives.
Step 3: Determine the XAMPP Architecture (32-bit or 64-bit)
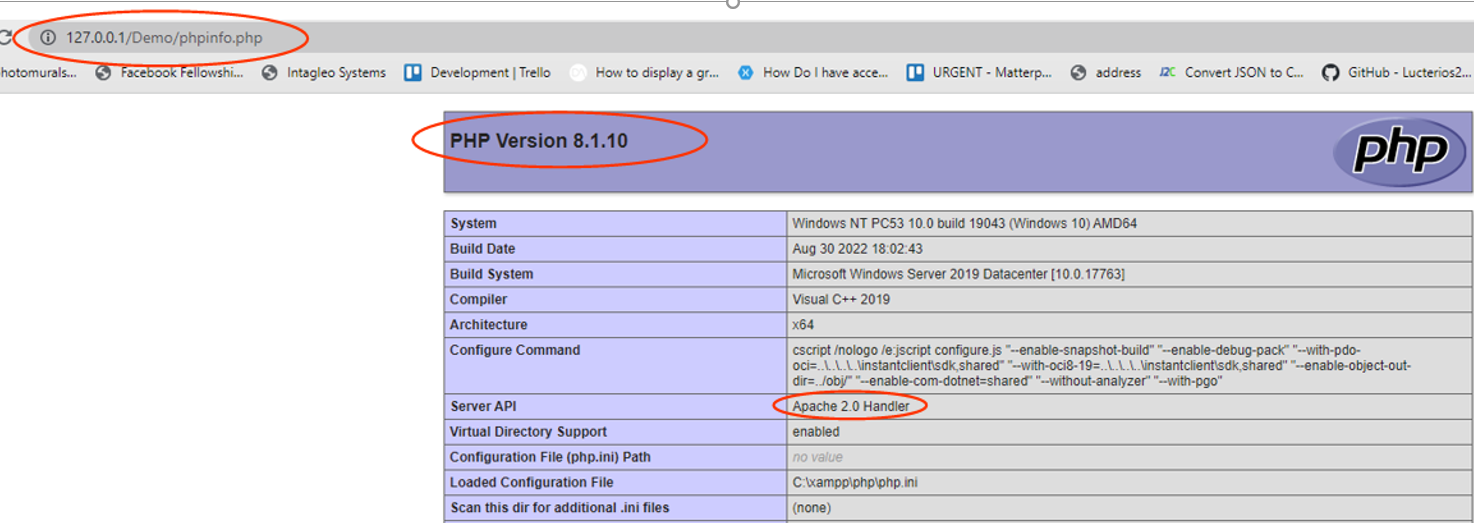
XAMPP Apache HTTP Server and the FastCGI module must match the same architecture. The phpinfo() function reveals whether XAMPP runs in 32-bit or 64-bit mode.
Create a file named
phpinfo.php in the XAMPP
htdocs directory with the following content:
<?php phpinfo(); ?>Open
http://localhost/phpinfo.php in a web browser. Check the
Architecturerow for
x64 (64-bit) or
x86 (32-bit). Note the
Server APIvalue — XAMPP defaults to "Apache 2.0 Handler". This tutorial replaces it with FastCGI.
Step 4: Download and Install the FastCGI Module (mod_fcgid)
XAMPP uses the Apache HTTP Server module handler by default. The module handler loads one PHP version into the Apache process. FastCGI (mod_fcgid) runs PHP as an external process, which allows Apache HTTP Server to route different projects to different PHP executables.
Download the
mod_fcgid module from
Apache Lounge. Select the
mod_fcgid package matching the XAMPP architecture (win64 or win32).
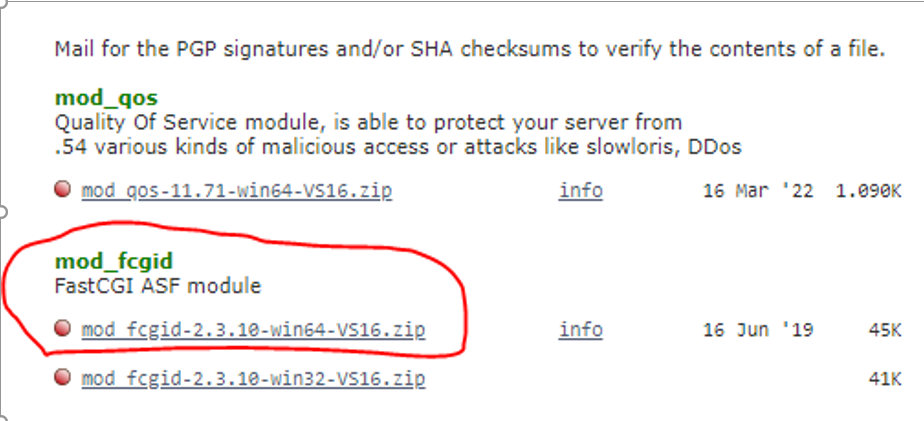
Extract the
mod_fcgid.so file from the downloaded ZIP package. Copy
mod_fcgid.so to the XAMPP Apache modules directory at
C:\xampp\apache\modules\.
Step 5: Configure Apache HTTP Server for FastCGI in XAMPP
XAMPP loads PHP through the Apache HTTP Server module handler by default. This step replaces the module handler with FastCGI so that Apache can route PHP requests to different PHP executables per virtual host.
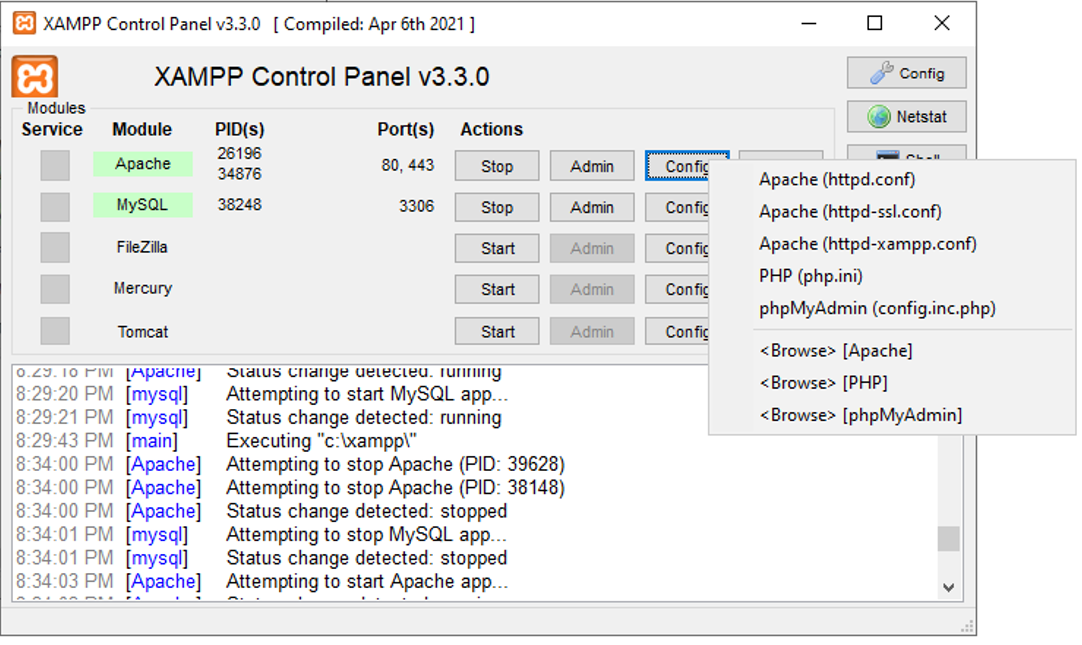
Open the XAMPP Control Panel. Click Configin the Apache row and select httpd-xampp.conf.
Locate the PHP module configuration block that looks like this:
# PHP-Module setup
LoadFile "C:/xampp/php/php8ts.dll"
LoadFile "C:/xampp/php/libpq.dll"
LoadModule php_module "C:/xampp/php/php8apache2_4.dll"
<FilesMatch "\.php$">
    SetHandler application/x-httpd-php
</FilesMatch>
<FilesMatch "\.phps$">
    SetHandler application/x-httpd-php-source
</FilesMatch>
Replace the entire block with the FastCGI configuration:
# PHP-Module setup via FastCGI (mod_fcgid)
LoadFile "C:/xampp/php/php8ts.dll"
LoadFile "C:/xampp/php/libpq.dll"
LoadModule fcgid_module modules/mod_fcgid.so
<IfModule fcgid_module>
    FcgidInitialEnv PATH "C:/xampp/php"
    FcgidInitialEnv SystemRoot "C:/Windows"
    FcgidInitialEnv SystemDrive "C:"
    FcgidInitialEnv TEMP "C:/xampp/tmp"
    FcgidInitialEnv TMP "C:/xampp/tmp"
    FcgidInitialEnv windir "C:/windows"
    FcgidIOTimeout 64
    FcgidConnectTimeout 16
    FcgidMaxRequestsPerProcess 1000
    FcgidMaxProcesses 3
    FcgidMaxRequestLen 8131072
    FcgidInitialEnv PHPRC "C:/xampp/php"
    FcgidInitialEnv PHP_FCGI_MAX_REQUESTS 1000
    <Files ~ "\.php$">
        Options Indexes FollowSymLinks ExecCGI
        AddHandler fcgid-script .php
        FcgidWrapper "C:/xampp/php/php-cgi.exe" .php
    </Files>
</IfModule>
The
FcgidWrapper directive points to the default PHP executable. The
FcgidInitialEnv PHPRC directive tells FastCGI where to find the
php.ini configuration file.
Update the phpMyAdmin section in the same file to allow FastCGI:
Alias /phpmyadmin "C:/xampp/phpMyAdmin/"
<Directory "C:/xampp/phpMyAdmin">
    Require local
    ErrorDocument 403 /error/XAMPP_FORBIDDEN.html.var
</Directory>
Step 6: Register the Additional PHP Version in Apache
XAMPP Apache HTTP Server needs a
ScriptAlias directive to map the additional PHP version to a handler name. This handler name is referenced in per-project virtual host configurations.
Add the following block to the end of the
httpd-xampp.conf file:
# PHP 7.4
ScriptAlias /php74 "C:/xampp/php74"
Action application/x-httpd-php74-cgi /php74/php-cgi.exe
SetEnv PHPRC "\\xampp\\php74"
<Directory "C:/xampp/php74">
    AllowOverride None
    Options None
    Require all denied
    <Files "php-cgi.exe">
        Require all granted
    </Files>
</Directory>
The
ScriptAlias directive maps the
/php74 URL path to the PHP 7.4 directory. The
Action directive creates a handler named
application/x-httpd-php74-cgi that routes PHP requests to the PHP 7.4 CGI executable.
Step 7: Assign a PHP Version to a Project Virtual Host
XAMPP virtual hosts control which PHP version each project uses. The
SetHandler directive inside a
<FilesMatch> block routes
.php files to the desired PHP version's FastCGI handler.
Open the virtual hosts configuration file at
C:\xampp\apache\conf\extra\httpd-vhosts.conf. Add a virtual host block that specifies the PHP 7.4 handler:
<VirtualHost *:80>
    DocumentRoot "C:/xampp/htdocs/demo"
    ServerName demo.local
    <Directory "C:/xampp/htdocs/demo">
        Require all granted
        AllowOverride All
        <FilesMatch "\.php$">
            SetHandler application/x-httpd-php74-cgi
        </FilesMatch>
    </Directory>
</VirtualHost>
The
SetHandler application/x-httpd-php74-cgi directive tells Apache HTTP Server to process all
.php files in this virtual host through the PHP 7.4 FastCGI handler registered in Step 6.
Add the domain to the Windows
hosts file at
C:\Windows\System32\drivers\etc\hosts:
127.0.0.1 demo.localRestart Apache HTTP Server from the XAMPP Control Panel.
Step 8: Verify the PHP Version Assignment in XAMPP
Open
http://demo.local/phpinfo.php in a web browser. The phpinfo() output displays the PHP version and the
Server APIvalue.
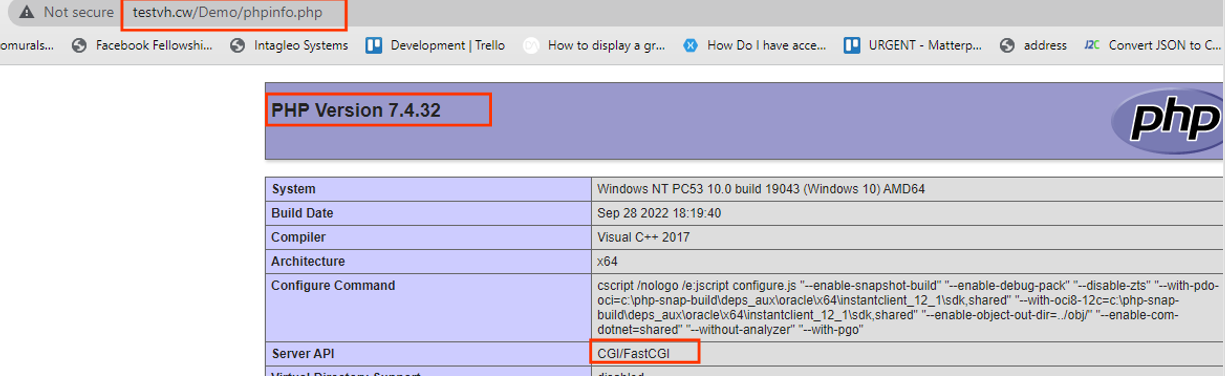
XAMPP Apache HTTP Server now processes PHP files for this project using PHP 7.4 through FastCGI. The Server APIrow shows "CGI/FastCGI" instead of "Apache 2.0 Handler". The PHP Versionrow shows "7.4.x".
What You Learned
XAMPP defaults to a single PHP version loaded as an Apache HTTP Server module. FastCGI (mod_fcgid) replaces the module handler and runs PHP as an external CGI process. Each virtual host in Apache can use a different
SetHandler directive to route PHP requests to a specific PHP executable. The
ScriptAlias and
Action directives in
httpd-xampp.conf register additional PHP versions as named handlers.
What to Do Next
To set up virtual hosts for additional projects, see How to set up Apache virtual hosts in XAMPP.
To locate and modify PHP settings for each PHP version, see
How to locate php.ini in XAMPP. Each PHP installation has its own
php.ini file in its respective directory.