phpMyAdmin tutorial: create and manage databases
Create databases, design tables with indexes and foreign keys, insert and query data, establish table relationships, and import/export SQL dumps in phpMyAdmin.
- What You Will Need
- Step 1: Create a New Database in phpMyAdmin
- Step 2: Create a Table in phpMyAdmin
- Define Column Structure in phpMyAdmin
- Common MySQL Data Types in phpMyAdmin
- Example: Create a Users Table with SQL in phpMyAdmin
- Step 3: Modify Table Structure with ALTER TABLE in phpMyAdmin
- Add a Column to a Table in phpMyAdmin
- Modify, Rename, and Drop Columns in phpMyAdmin
- Step 4: Insert and Edit Data in phpMyAdmin
- Insert Rows Through the phpMyAdmin Interface
- Browse, Edit, and Delete Rows in phpMyAdmin
- Step 5: Create Table Relationships with Foreign Keys in phpMyAdmin
- Relationship Types in MySQL
- Use the phpMyAdmin Designer to Create Relationships
- Create Relationships with SQL in phpMyAdmin
- Step 6: Export a Database from phpMyAdmin
- Quick Export in phpMyAdmin
- Custom Export in phpMyAdmin
- Command-Line Export with mysqldump
- Step 7: Import Data into phpMyAdmin
- Import Through the phpMyAdmin Interface
- Command-Line Import for Large Files
- Handle Import Errors in phpMyAdmin
- What You Learned
- What to Do Next
This tutorial walks through creating databases, designing tables, inserting data, building foreign key relationships, and importing/exporting SQL dumps in phpMyAdmin. By the end, you will understand how phpMyAdmin maps its graphical interface to the underlying SQL statements that MySQL and MariaDB execute.
What You Will Need
- A running phpMyAdmin instance connected to MySQL 5.5+ or MariaDB 5.5+. See the phpMyAdmin installation tutorialfor setup instructions.
- A MySQL user account with CREATE, ALTER, INSERT, SELECT, UPDATE, and DELETE privileges.
Step 1: Create a New Database in phpMyAdmin
phpMyAdmin creates databases by executing a
CREATE DATABASE SQL statement against the MySQL server. Each database acts as a container for tables, views, stored procedures, and user-defined functions.
Click the
Databasestab in the top navigation bar. Enter a database name in the "Create database" field. Select
utf8mb4_unicode_ci from the collation dropdown. Click
Create.
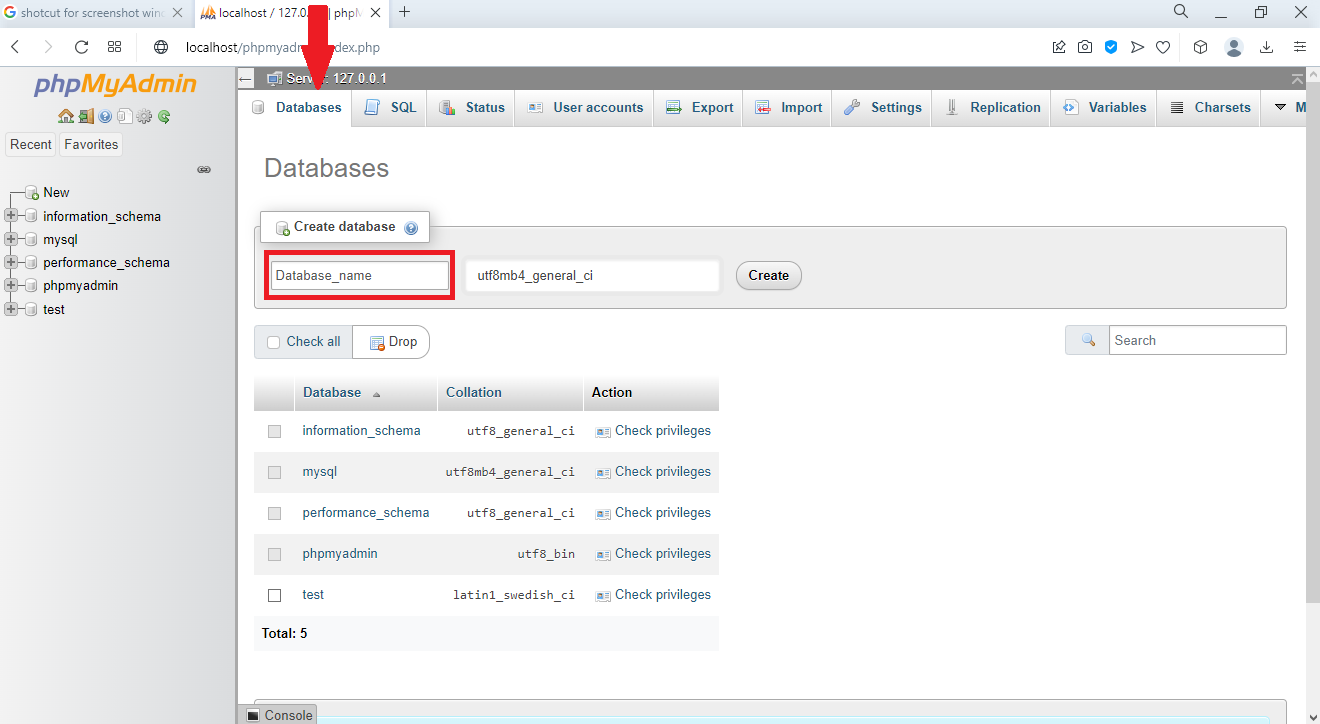 Database creation interface in phpMyAdmin
phpMyAdmin executes this SQL statement behind the scenes:
CREATE DATABASE my_database
CHARACTER SET utf8mb4
COLLATE utf8mb4_unicode_ci;
The
utf8mb4 character set supports the full Unicode range, including emoji and special characters. The
unicode_ci collation provides case-insensitive string comparisons for most languages. Use lowercase names with underscores for database names (for example,
ecommerce_store or
blog_production). Avoid spaces and special characters because they require backtick quoting in SQL.
Step 2: Create a Table in phpMyAdmin
phpMyAdmin creates tables by generating a
CREATE TABLE statement from the values entered in the table creation form. Each table stores rows of data organized into columns with defined data types and constraints.
Select the new database from the left sidebar. Enter a table name (for example,
users) and the number of columns in the "Create table" section. Click
Create.
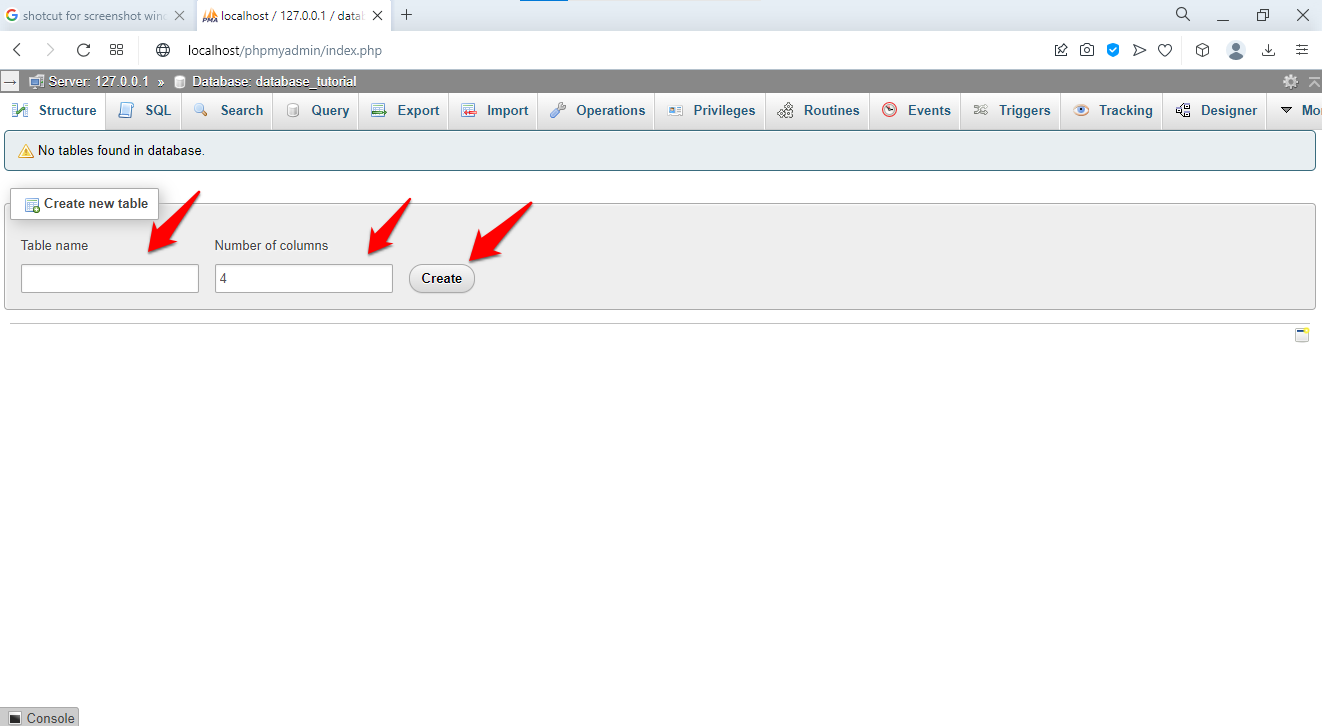 Table creation form specifying name and column count
Define Column Structure in phpMyAdmin
phpMyAdmin displays a form with one row per column. Each row requires a column name, data type, length, and optional attributes.
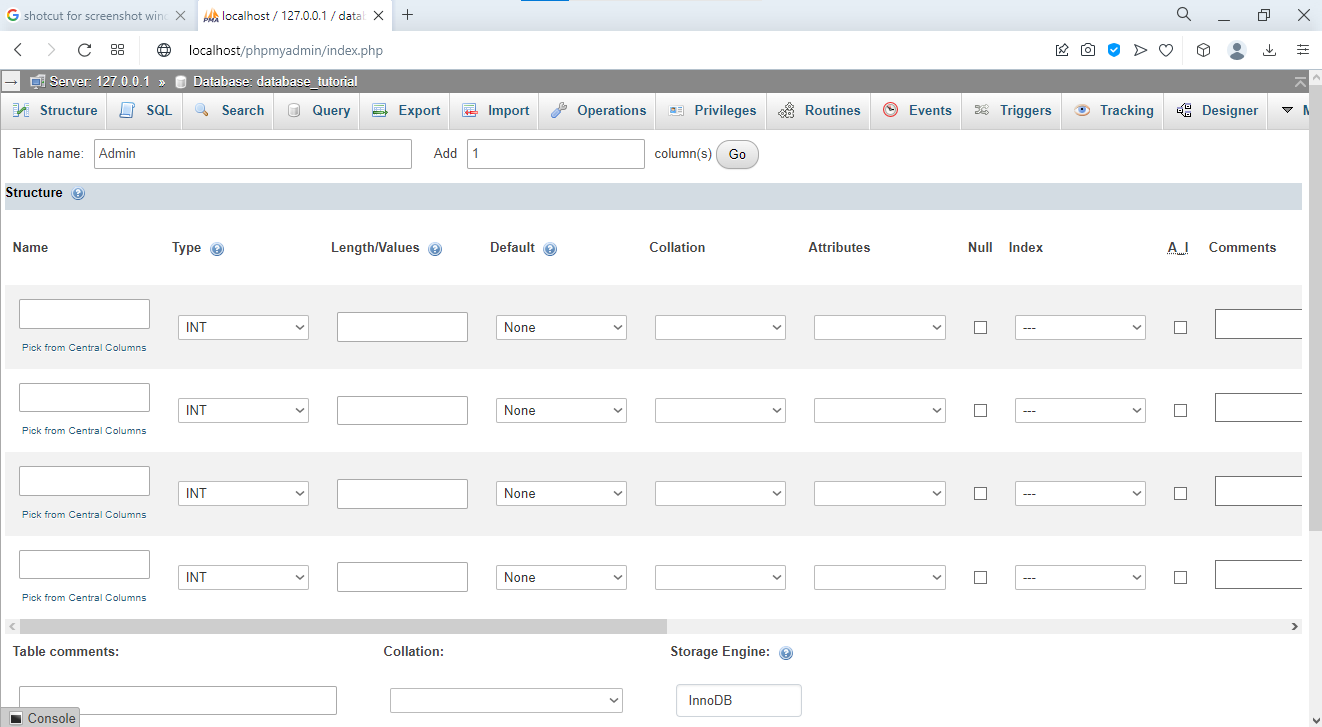 Column definition interface showing all available options
| Field | Description | Example |
|---|---|---|
| Name | Column identifier used in SQL queries | user_id,
email,
created_at |
| Type | MySQL data type that controls storage format | INT,
VARCHAR,
TEXT,
DATE |
| Length/Values | Maximum size or allowed values | 255 for VARCHAR,
11 for INT |
| Default | Value inserted when no explicit value is provided | NULL,
CURRENT_TIMESTAMP |
| Collation | Character encoding for text columns | utf8mb4_unicode_ci |
| Null | Whether the column accepts NULL values | Checked or unchecked |
| Index | Index type for query performance | PRIMARY,
UNIQUE,
INDEX |
| A_I | Auto Increment: MySQL assigns sequential IDs automatically | Check for primary key columns |
Common MySQL Data Types in phpMyAdmin
phpMyAdmin supports all MySQL data types. These are the most frequently used types when creating tables:
| Type | Use Case | Example |
|---|---|---|
INT | Whole numbers for IDs, quantities, and counts | User IDs, product quantities |
VARCHAR(n) | Variable-length text up to
n characters | Names, emails, short descriptions |
TEXT | Long text content without a length limit | Article body, comments |
DATE | Date in
YYYY-MM-DD format | Birth dates, publication dates |
DATETIME | Date and time in
YYYY-MM-DD HH:MM:SS format | Event timestamps |
TIMESTAMP | Auto-updating timestamp based on row modifications | created_at,
updated_at |
DECIMAL(p,s) | Fixed-precision decimal with
p total digits and
s decimal places | Prices, measurements |
BOOLEAN/
TINYINT(1) | True/false values stored as 1 or 0 | is_active,
is_published |
ENUM | Column restricted to a predefined list of string values | Status:
'pending',
'active',
'inactive' |
Example: Create a Users Table with SQL in phpMyAdmin
phpMyAdmin's SQL tab accepts direct SQL statements. This CREATE TABLE statement produces the same result as filling out the graphical form:
CREATE TABLE users (
    user_id INT(11) NOT NULL AUTO_INCREMENT,
    username VARCHAR(50) NOT NULL UNIQUE,
    email VARCHAR(100) NOT NULL UNIQUE,
    password_hash CHAR(60) NOT NULL,
    full_name VARCHAR(100),
    date_of_birth DATE,
    created_at TIMESTAMP DEFAULT CURRENT_TIMESTAMP,
    updated_at TIMESTAMP DEFAULT CURRENT_TIMESTAMP ON UPDATE CURRENT_TIMESTAMP,
    is_active BOOLEAN DEFAULT 1,
    PRIMARY KEY (user_id),
    INDEX idx_email (email),
    INDEX idx_username (username)
) ENGINE=InnoDB DEFAULT CHARSET=utf8mb4 COLLATE=utf8mb4_unicode_ci;
The
InnoDB storage engine supports foreign key constraints and ACID transactions. The
AUTO_INCREMENT attribute on
user_id assigns a sequential integer to each new row. The
UNIQUE constraint on
email and
username prevents duplicate values across rows.
Step 3: Modify Table Structure with ALTER TABLE in phpMyAdmin
phpMyAdmin modifies existing tables through the
Structuretab. Each modification generates an
ALTER TABLE SQL statement.
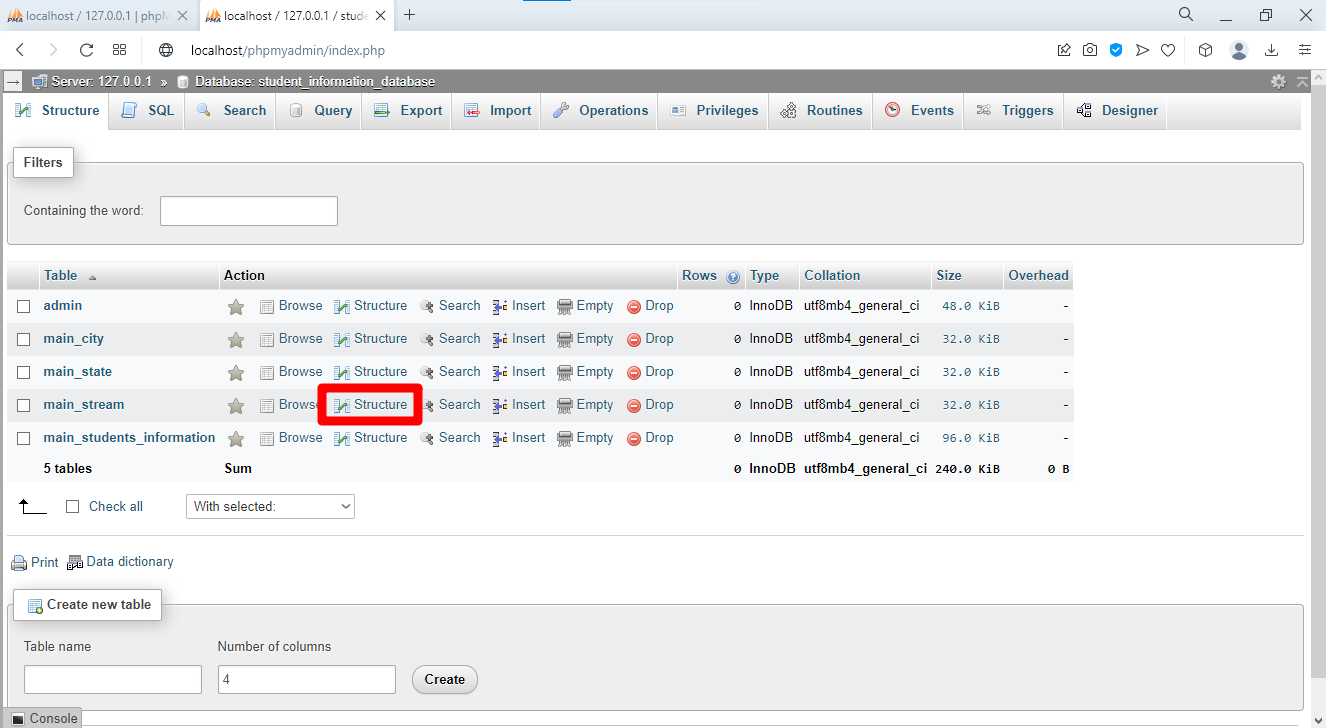
Select a table from the left sidebar. Click the Structuretab to view all columns.
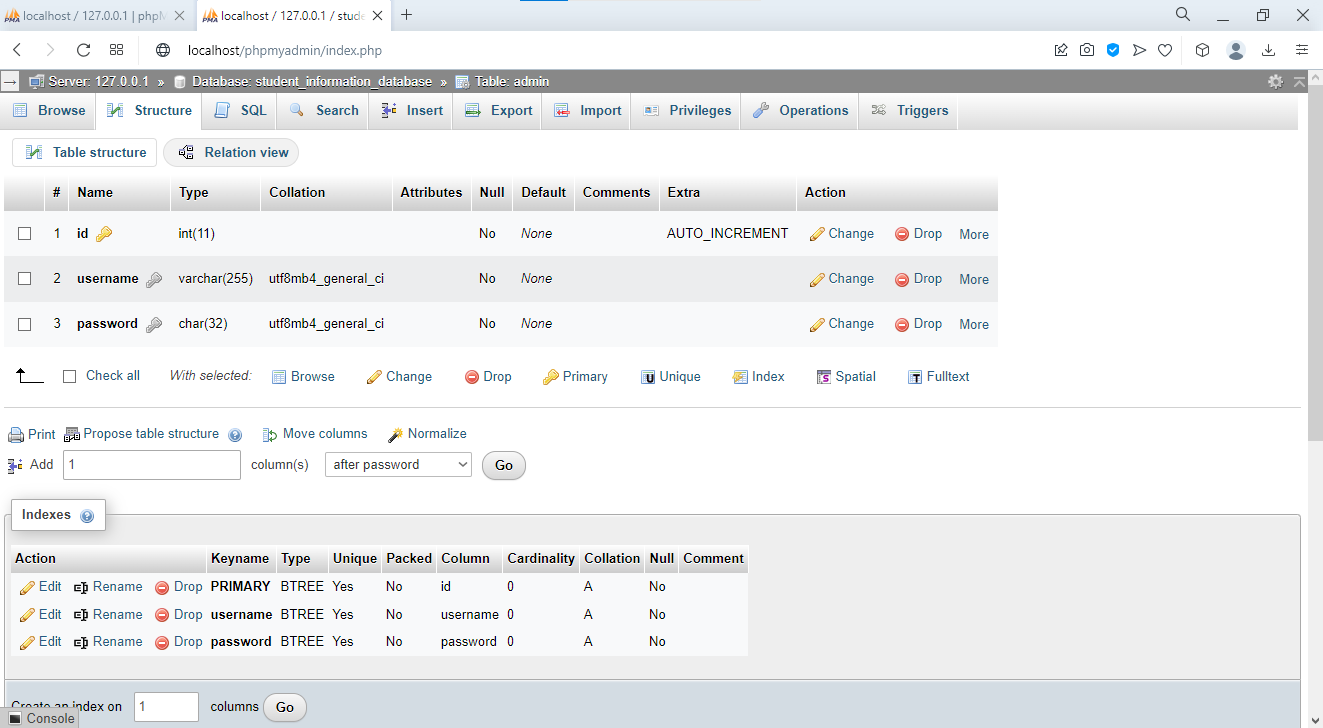 Table structure view showing modification options
Add a Column to a Table in phpMyAdmin
Enter the number of columns to add in the "Add column(s)" field. Select the position: "At end of table" or "After [column_name]". Click Goand define the new column.
 Interface for adding new columns to existing table
phpMyAdmin executes the equivalent SQL:
ALTER TABLE users ADD COLUMN phone VARCHAR(20) AFTER email;Modify, Rename, and Drop Columns in phpMyAdmin
phpMyAdmin provides action buttons in the Structure view for each column: Change(modify definition), Drop(delete column), Primary(set as primary key), Unique(add unique constraint), and Index(add index).
-- Modify a column's data type
ALTER TABLE users MODIFY COLUMN phone VARCHAR(25);

-- Rename a column
ALTER TABLE users CHANGE COLUMN phone phone_number VARCHAR(25);

-- Drop a column permanently
ALTER TABLE users DROP COLUMN phone_number;

-- Add an index for faster queries on a column
ALTER TABLE users ADD INDEX idx_created_at (created_at);

-- Add a foreign key constraint linking two tables
ALTER TABLE orders
ADD CONSTRAINT fk_user_id
FOREIGN KEY (user_id) REFERENCES users(user_id)
ON DELETE CASCADE ON UPDATE CASCADE;
Step 4: Insert and Edit Data in phpMyAdmin
phpMyAdmin provides both a graphical form and a SQL editor for inserting and modifying rows. Each row operation translates to an INSERT, UPDATE, or DELETE SQL statement.
Insert Rows Through the phpMyAdmin Interface
Select a table from the sidebar. Click the Inserttab. Fill in the column values and click Go. phpMyAdmin generates an INSERT statement and executes it:
INSERT INTO users (username, email, password_hash, full_name, date_of_birth)
VALUES ('johndoe', 'john@example.com', '$2y$10$...', 'John Doe', '1990-05-15');
Insert multiple rows in a single SQL statement for efficiency:
INSERT INTO users (username, email, password_hash, full_name) VALUES
('janedoe', 'jane@example.com', '$2y$10$...', 'Jane Doe'),
('bobsmith', 'bob@example.com', '$2y$10$...', 'Bob Smith'),
('alicejones', 'alice@example.com', '$2y$10$...', 'Alice Jones');
Browse, Edit, and Delete Rows in phpMyAdmin
Click the Browsetab to view all rows in a table. phpMyAdmin displays pagination controls, a row count selector, and sort buttons on each column header.
Click the Editicon (pencil) next to a row to open the edit form. Modify the values and click Go. phpMyAdmin executes an UPDATE statement:
UPDATE users SET email = 'newemail@example.com' WHERE user_id = 5;Double-click any cell in Browse view for inline editing. Press Enter to save or Escape to cancel.
Click the Deleteicon (X) next to a row to remove it permanently. phpMyAdmin executes a DELETE statement:
DELETE FROM users WHERE user_id = 5;Step 5: Create Table Relationships with Foreign Keys in phpMyAdmin
phpMyAdmin creates foreign key constraints between tables using the Designer visual interface or the Relation view. Foreign keys enforce referential integrity by requiring that a value in the child table matches an existing value in the parent table's primary key column.
Relationship Types in MySQL
| Type | Description | Example |
|---|---|---|
| One-to-One | Each row in Table A matches exactly one row in Table B | users to
user_profiles |
| One-to-Many | One row in Table A matches multiple rows in Table B | customers to
orders |
| Many-to-Many | Multiple rows in both tables relate through a junction table | students to
courses via
enrollments |
Use the phpMyAdmin Designer to Create Relationships
phpMyAdmin's Designer provides a visual drag-and-drop interface for creating foreign key constraints.
Select the database from the sidebar. Click the Designertab. phpMyAdmin displays all tables as draggable boxes with column names.
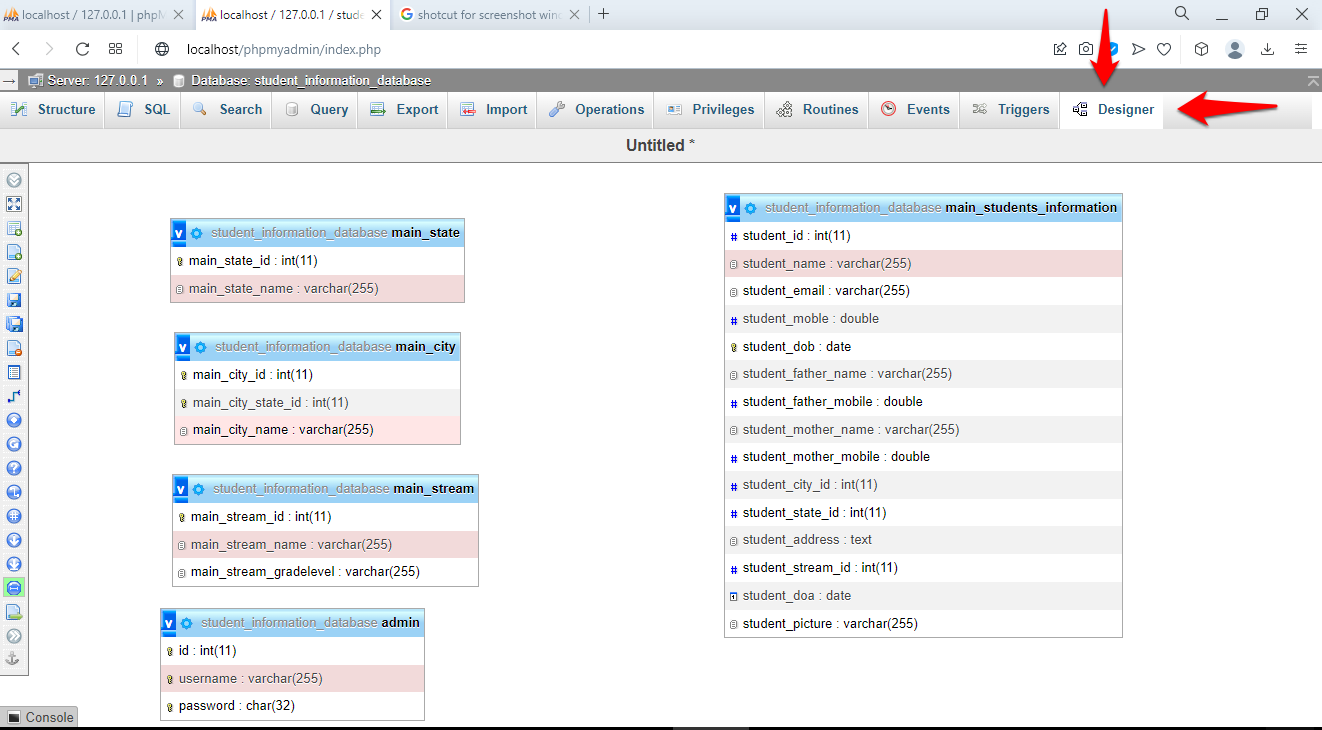 Designer view showing visual representation of database tables
Click the Create relationbutton in the left toolbar.
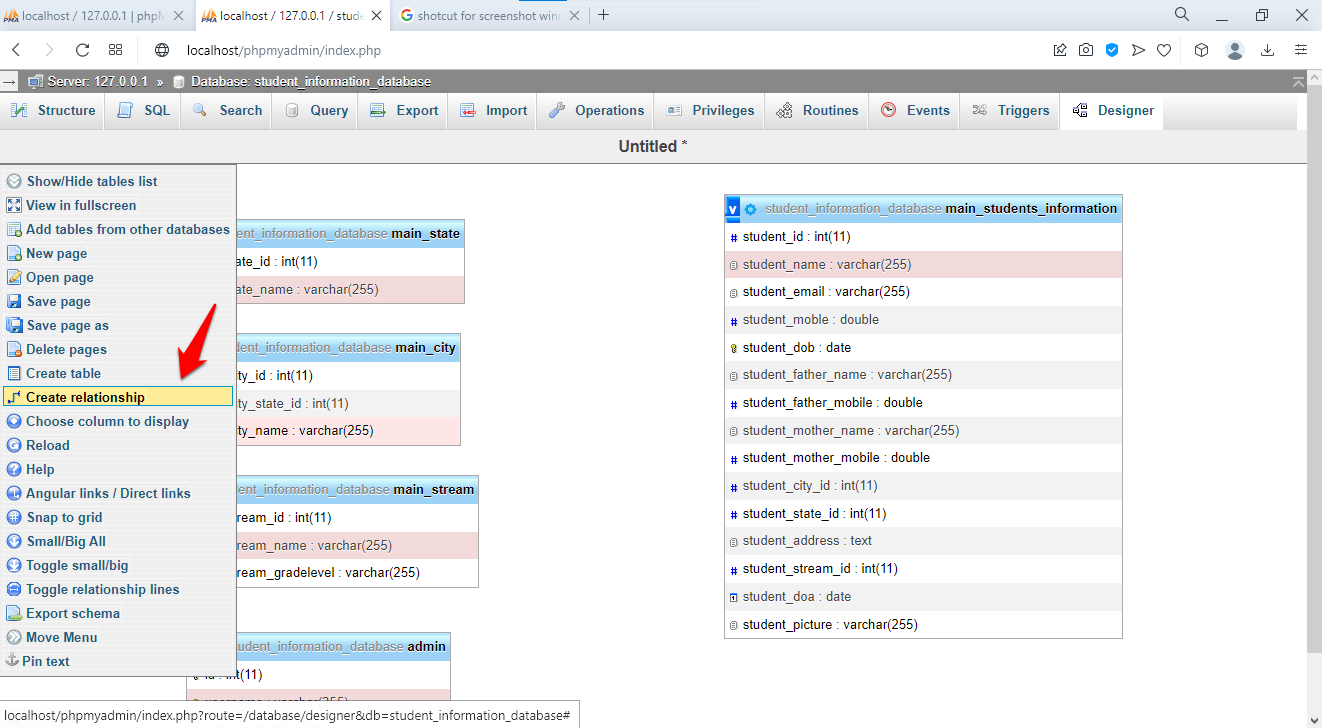 Create relation button highlighted in Designer toolbar
Click the foreign key column in the child table (for example,
orders.user_id). Then click the primary key column in the parent table (for example,
users.user_id).
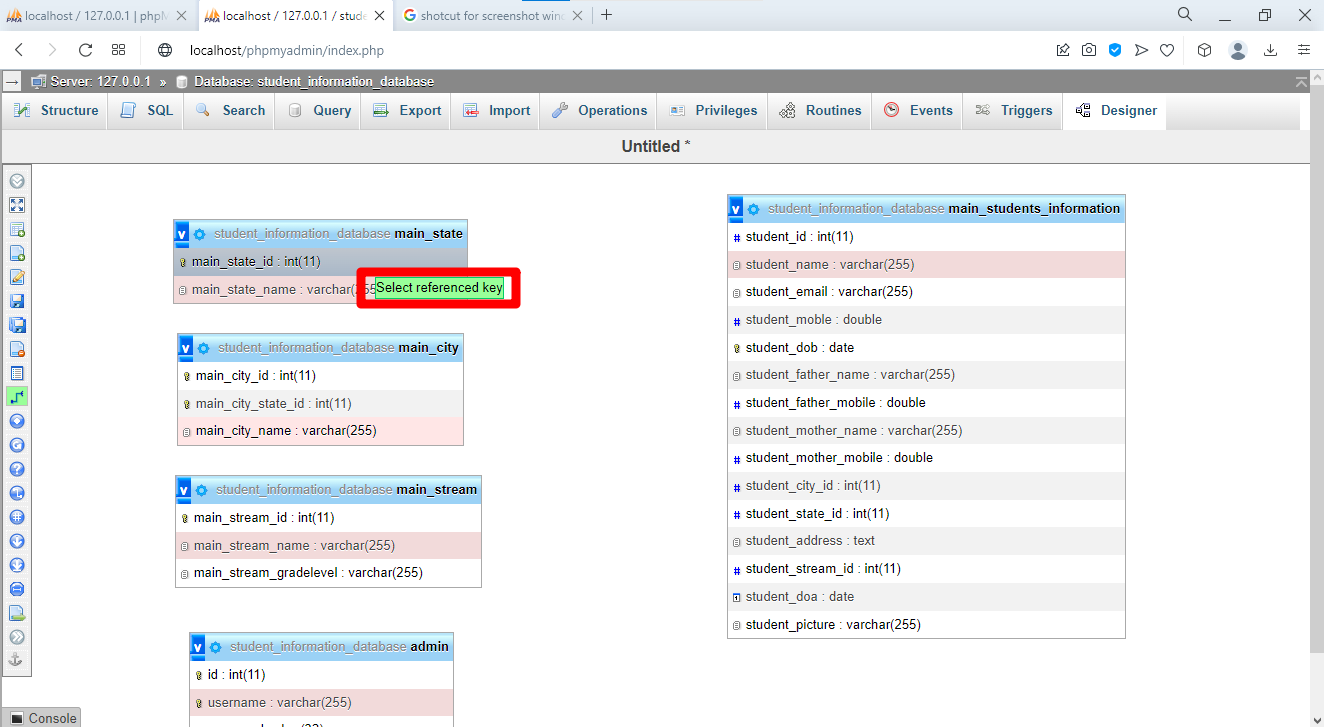 Selecting referenced key for relationship creation
phpMyAdmin displays a configuration dialog for the referential action:
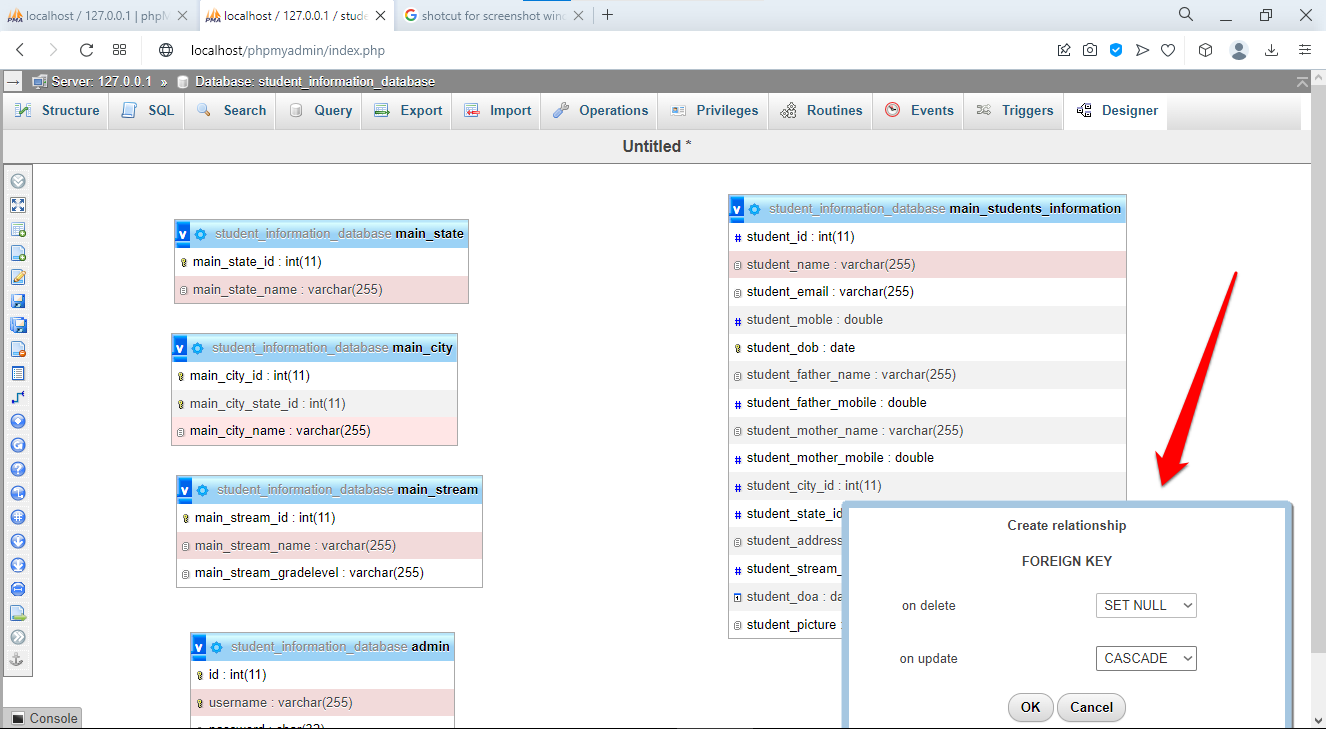 Relationship configuration dialog
| Option | Description | When to Use |
|---|---|---|
| ON DELETE CASCADE | MySQL deletes child rows when the parent row is deleted | Users and their posts |
| ON DELETE SET NULL | MySQL sets the foreign key to NULL when the parent is deleted | Optional relationships |
| ON DELETE RESTRICT | MySQL blocks deletion of a parent row that has child rows | Preserve data integrity |
| ON UPDATE CASCADE | MySQL updates child foreign key values when the parent key changes | Maintain consistency |
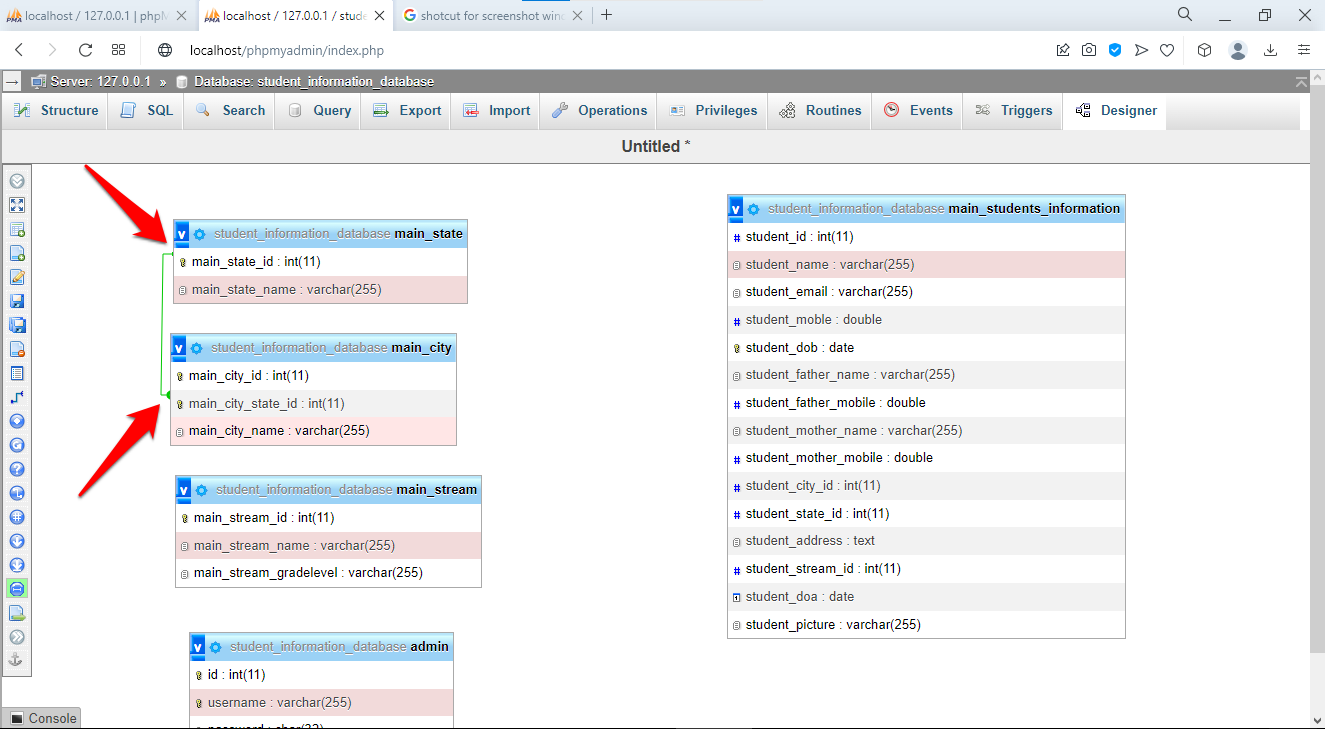 Visual representation of table relationships with connecting lines
Create Relationships with SQL in phpMyAdmin
phpMyAdmin's SQL editor accepts foreign key constraint definitions directly. This example creates a blog database with users, posts, comments, and tags:
CREATE TABLE users (
    user_id INT(11) NOT NULL AUTO_INCREMENT,
    username VARCHAR(50) NOT NULL UNIQUE,
    email VARCHAR(100) NOT NULL,
    PRIMARY KEY (user_id)
) ENGINE=InnoDB;

CREATE TABLE posts (
    post_id INT(11) NOT NULL AUTO_INCREMENT,
    user_id INT(11) NOT NULL,
    title VARCHAR(200) NOT NULL,
    content TEXT,
    created_at TIMESTAMP DEFAULT CURRENT_TIMESTAMP,
    PRIMARY KEY (post_id),
    INDEX idx_user_id (user_id),
    CONSTRAINT fk_posts_user FOREIGN KEY (user_id)
        REFERENCES users(user_id)
        ON DELETE CASCADE
        ON UPDATE CASCADE
) ENGINE=InnoDB;

CREATE TABLE comments (
    comment_id INT(11) NOT NULL AUTO_INCREMENT,
    post_id INT(11) NOT NULL,
    user_id INT(11) NOT NULL,
    comment_text TEXT NOT NULL,
    created_at TIMESTAMP DEFAULT CURRENT_TIMESTAMP,
    PRIMARY KEY (comment_id),
    INDEX idx_post_id (post_id),
    INDEX idx_user_id (user_id),
    CONSTRAINT fk_comments_post FOREIGN KEY (post_id)
        REFERENCES posts(post_id)
        ON DELETE CASCADE,
    CONSTRAINT fk_comments_user FOREIGN KEY (user_id)
        REFERENCES users(user_id)
        ON DELETE CASCADE
) ENGINE=InnoDB;

CREATE TABLE tags (
    tag_id INT(11) NOT NULL AUTO_INCREMENT,
    tag_name VARCHAR(50) NOT NULL UNIQUE,
    PRIMARY KEY (tag_id)
) ENGINE=InnoDB;

CREATE TABLE post_tags (
    post_id INT(11) NOT NULL,
    tag_id INT(11) NOT NULL,
    PRIMARY KEY (post_id, tag_id),
    CONSTRAINT fk_posttags_post FOREIGN KEY (post_id)
        REFERENCES posts(post_id)
        ON DELETE CASCADE,
    CONSTRAINT fk_posttags_tag FOREIGN KEY (tag_id)
        REFERENCES tags(tag_id)
        ON DELETE CASCADE
) ENGINE=InnoDB;
The
post_tags junction table implements a many-to-many relationship between
posts and
tags. Its composite primary key (
post_id,
tag_id) prevents duplicate tag assignments on the same post.
Step 6: Export a Database from phpMyAdmin
phpMyAdmin exports databases as SQL dump files, CSV spreadsheets, JSON documents, or XML files. SQL format preserves the complete database structure and data for backup and migration purposes.
Quick Export in phpMyAdmin
Select the database from the sidebar. Click the Exporttab. Select Quickexport method and SQLformat. Click Go. phpMyAdmin generates a SQL dump file and downloads it through the browser.
Custom Export in phpMyAdmin
Select Customexport method for control over which tables, structure options, and data options to include.
Export format options:
| Format | Use Case |
|---|---|
| SQL | Complete backup with CREATE TABLE statements, indexes, constraints, and INSERT data |
| CSV | Import into Excel, Google Sheets, or data analysis tools |
| JSON | Consume in web applications and REST APIs |
| XML | Exchange data between heterogeneous systems |
Recommended SQL export settings for backups:
- Check "Add DROP TABLE / VIEW / PROCEDURE" for clean restores.
- Check "Add CREATE DATABASE / USE statement" for standalone import.
- Check "Complete INSERT (includes column names)" for readable SQL.
- Select gzip or zip compression for smaller file sizes.
Command-Line Export with mysqldump
phpMyAdmin's browser-based export hits PHP timeout limits on large databases. Use
mysqldump for databases larger than 50 MB:
# Export an entire database
mysqldump -u username -p database_name > backup.sql

# Export specific tables
mysqldump -u username -p database_name table1 table2 > tables_backup.sql

# Export with gzip compression
mysqldump -u username -p database_name | gzip > backup.sql.gz

# Export structure only (no data)
mysqldump -u username -p --no-data database_name > structure.sql

# Export data only (no structure)
mysqldump -u username -p --no-create-info database_name > data.sql
Step 7: Import Data into phpMyAdmin
phpMyAdmin imports SQL dump files, CSV files, and other formats into a target database. The import function executes the SQL statements in the uploaded file against the selected database.
Import Through the phpMyAdmin Interface
Select the destination database from the sidebar. Click the Importtab.
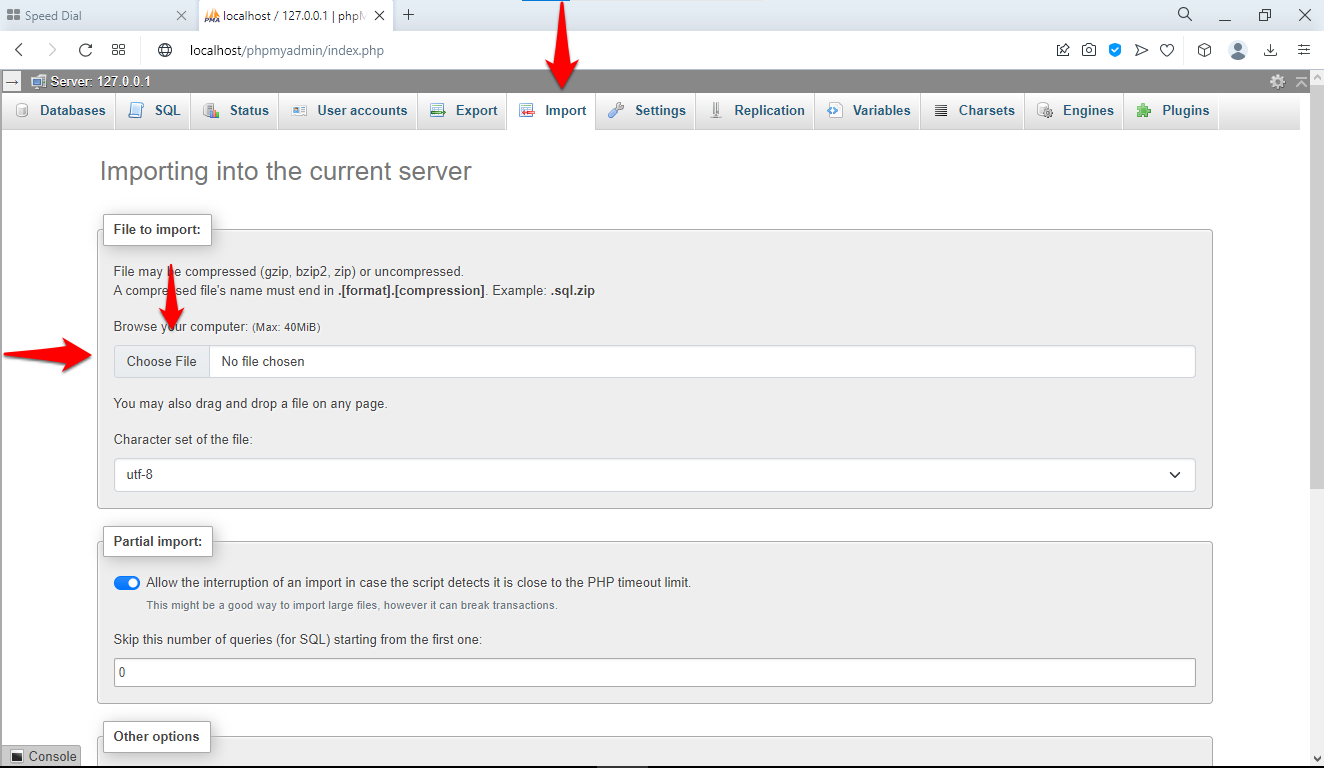 Import tab interface for uploading database files
Click
Choose Fileand select the
.sql file. Set the character encoding to
utf-8. Click
Go.
 Import configuration options
phpMyAdmin's maximum upload size depends on the PHP
upload_max_filesize and
post_max_size settings. The default limit is often 2 MB. See
phpMyAdmin best practicesfor instructions on increasing this limit.
Command-Line Import for Large Files
Use the MySQL command-line client for SQL files larger than 50 MB:
# Import a SQL dump file
mysql -u username -p database_name < backup.sql
# Import a gzip-compressed file
gunzip < backup.sql.gz | mysql -u username -p database_name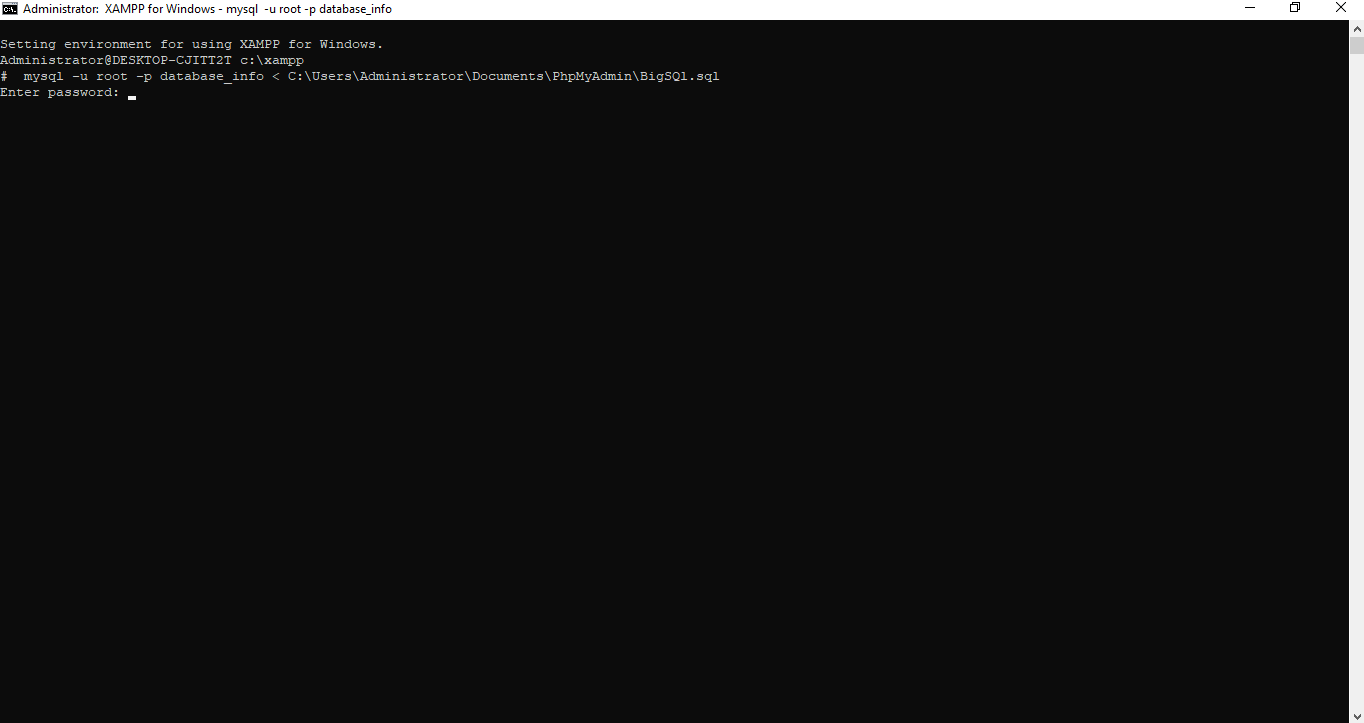 Command-line interface showing database import process
Handle Import Errors in phpMyAdmin
Disable foreign key checks if the import fails due to constraint violations. Add these lines to the top and bottom of the SQL file:
SET FOREIGN_KEY_CHECKS=0;
-- Import statements
SET FOREIGN_KEY_CHECKS=1;
Split large SQL files into smaller chunks if timeouts occur:
split -l 10000 largefile.sql smallfile_What You Learned
This tutorial covered the complete database management workflow in phpMyAdmin. The
CREATE DATABASE statement with
utf8mb4_unicode_ci collation creates Unicode-compatible databases. The
CREATE TABLE statement defines column data types, primary keys, and AUTO_INCREMENT counters. The
ALTER TABLE statement modifies existing table structures by adding, changing, or dropping columns. Foreign key constraints enforce referential integrity between related tables. The phpMyAdmin Designer provides a visual interface for creating and viewing these constraints. SQL exports produce backup files, and imports restore them.
What to Do Next
Build a complete multi-table database system from scratch. See the phpMyAdmin student information system tutorialfor a real-world example.
Learn about advanced operations such as global search, UTF-8 configuration, and custom URL aliases. See the phpMyAdmin advanced operations tutorial.