How to Query DNS Records with dig
Run the dig command to query DNS records for a domain, read the output sections, and filter results with query options.
Run Domain Information Groper (dig) to query DNS records for any domain and interpret the response output.
Prerequisites
- A Linux, macOS, or Windows (WSL) system with terminal access.
- The
digcommand installed. On Debian/Ubuntu, install it withsudo apt install dnsutils. On RHEL/CentOS/Fedora, install it withsudo dnf install bind-utils. - An active internet connection to reach DNS servers.
Step-by-Step: Query DNS Records with dig
- Open a terminal and run dig followed by the domain name. dig sends a DNS query for the A record (IPv4 address) by default:
dig example.comdig returns a detailed response divided into sections: HEADER, QUESTION, ANSWER, AUTHORITY, ADDITIONAL, and statistics.
; <<>> DiG 9.18.28 <<>> example.com
;; global options: +cmd
;; Got answer:
;; ->>HEADER<<- opcode: QUERY, status: NOERROR, id: 62896
;; flags: qr rd ra ad; QUERY: 1, ANSWER: 1, AUTHORITY: 0, ADDITIONAL: 1

;; OPT PSEUDOSECTION:
; EDNS: version: 0, flags:; udp: 1232
;; QUESTION SECTION:
;example.com.                   IN      A

;; ANSWER SECTION:
example.com.        86400   IN      A       93.184.216.34

;; Query time: 45 msec
;; SERVER: 10.99.0.1#53(10.99.0.1)
;; WHEN: Sat Mar 08 12:05:08 UTC 2026
;; MSG SIZE rcvd: 56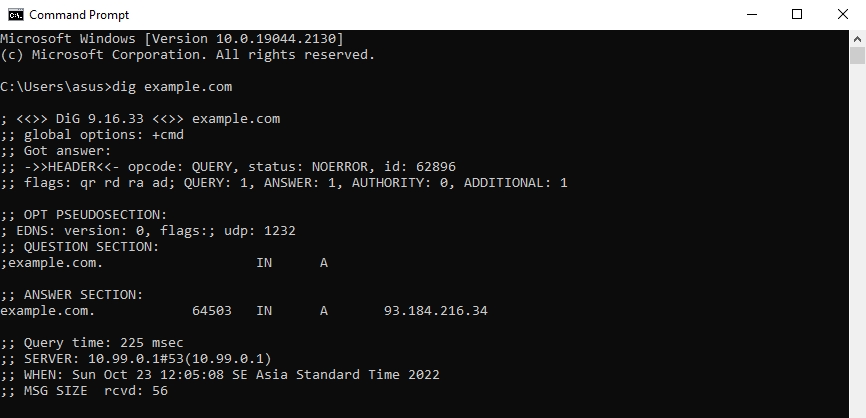
- Query a specific DNS record type by appending the record type after the domain name. dig accepts types such as A, AAAA, MX, NS, SOA, TXT, CNAME, PTR, and ANY:
dig example.com MXdig returns the Mail Exchange (MX) records in the ANSWER section with priority values and mail server hostnames.
- Filter the dig output to display the answer section only. Combine
+noallto suppress all sections with+answerto re-enable the answer section:
dig example.com +noall +answerdig displays the DNS records without headers, comments, or statistics.
- Display the record value in short form by appending
+short. dig returns the IP address or record value on a single line without any metadata:
dig example.com +short
93.184.216.34- Query a specific DNS server by adding
@serverbefore the domain name. dig bypasses the system resolver and sends the query to the specified nameserver:
dig @8.8.8.8 example.comdig displays the response from Google Public DNS (8.8.8.8) instead of the default resolver configured in
/etc/resolv.conf.
dig Command Syntax Reference
Domain Information Groper (dig) follows this general syntax pattern:
dig [@server] [name] [type] [options]@server-- the DNS resolver IP address or hostname to query.name-- the domain name to look up.type-- the DNS record type (A, AAAA, MX, NS, SOA, TXT, CNAME, PTR, ANY).options-- query options prefixed with+that modify output and behavior.
See the dig Referencespage for the complete list of flags and query options.
How to Verify the DNS Query Was Successful
Domain Information Groper (dig) confirms a successful query when the HEADER section shows
status: NOERROR and the ANSWER section contains at least one record. Check the
ANSWER: 1 (or higher) count in the flags line. A
status: NXDOMAIN response means the domain name does not exist in DNS.
Common Issues When Querying DNS Records with dig
- "command not found" error: dig is not installed. Install the
dnsutilspackage on Debian/Ubuntu orbind-utilson RHEL/CentOS/Fedora. - "connection timed out" error: dig cannot reach the DNS server. Check network connectivity and firewall rules for outbound UDP and TCP port 53.
status: SERVFAILin the response: The DNS server failed to process the query. Try a different resolver withdig @1.1.1.1 example.com.status: NXDOMAINin the response: The queried domain name does not exist in DNS. Verify the domain spelling.- Empty ANSWER section: The requested record type does not exist for the domain. Confirm the correct record type is being queried (A, MX, NS).