How to Query a Domain Using a Specific DNS Server with dig
Use dig with the @ argument to query a specific DNS server such as Google DNS or Cloudflare DNS instead of the system resolver.
Query a domain through a specific DNS server with Domain Information Groper (dig) to bypass the system resolver and compare results across different nameservers.
Prerequisites
- A Linux, macOS, or Windows (WSL) system with terminal access.
- The
digcommand installed. On Debian/Ubuntu, install it withsudo apt install dnsutils. On RHEL/CentOS/Fedora, install it withsudo dnf install bind-utils. - An active internet connection to reach the target DNS server.
- The IP address or hostname of the DNS server to query (e.g.,
8.8.8.8for Google Public DNS,1.1.1.1for Cloudflare DNS).
Step-by-Step: Query a Specific DNS Server with dig
- Open a terminal and run dig with the
@serverargument before the domain name. dig sends the DNS query to the specified server instead of the default system resolver configured in/etc/resolv.conf:
dig @8.8.8.8 example.comdig displays the full DNS response from Google Public DNS (8.8.8.8). The statistics footer confirms which server answered the query.
;; ANSWER SECTION:
example.com.        86400   IN      A       93.184.216.34

;; Query time: 15 msec
;; SERVER: 8.8.8.8#53(8.8.8.8)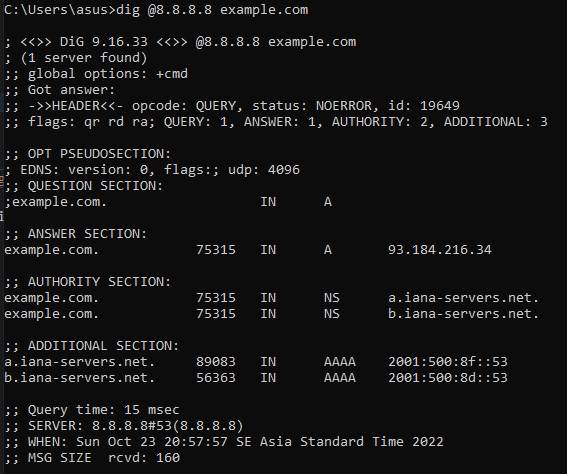
- Query Cloudflare DNS (1.1.1.1) to compare the result from a different resolver. dig returns the response from Cloudflare's nameserver:
dig @1.1.1.1 example.com- Query the authoritative nameserver for a domain directly. First, find the authoritative nameservers with an NS query, then query one of them:
dig example.com NS +short
a.iana-servers.net.
b.iana-servers.net.
dig @a.iana-servers.net example.comdig returns the response from the authoritative server. The HEADER section shows the
aa (Authoritative Answer) flag when the server is authoritative for the domain.
- Add
+shortto display the IP address only. dig returns the record value without metadata when querying a specific DNS server:
dig @8.8.8.8 example.com +short- Query a specific DNS server for a particular record type. dig accepts the record type after the domain name:
dig @8.8.8.8 example.com MXHow to Verify the Query Used the Correct DNS Server
Domain Information Groper (dig) displays the responding server's IP address and port in the statistics footer. Check the
SERVER: line to confirm the query reached the intended DNS server. The line reads
SERVER: 8.8.8.8#53(8.8.8.8) when Google Public DNS answered the query.
Common Issues When Querying a Specific DNS Server with dig
- "connection timed out" error: dig cannot reach the specified DNS server. Verify the server IP address is correct and that firewall rules allow outbound traffic on UDP and TCP port 53.
- Different results from different DNS servers: DNS caching causes resolvers to return cached records with varying TTL values. The authoritative nameserver provides the canonical answer. CDN-based domains return different IP addresses based on the resolver's geographic location.
status: REFUSEDin the response: The DNS server refuses queries from external sources. Some nameservers only accept queries from authorized IP addresses. Try a public resolver such as Google Public DNS (8.8.8.8) or Cloudflare DNS (1.1.1.1).- Querying by hostname instead of IP: dig resolves the server hostname before sending the query. Use the IP address directly (e.g.,
@8.8.8.8instead of@dns.google) to avoid an extra DNS lookup.